Pages

Sunday, September 30, 2012

Pumpkin Whoopie Pies

The first time I ever ate one of these was at a former local bakery next to my office. I swore at that time that I would somehow figure out the recipe and make them because they were so good. That was probably five years ago. I haven't had one since, and the bakery is now a very popular restaurant serving gourmet sandwiches and luncheon entrees, along with some dinner hours and having a bakery of their own. I would love to someday have my recipes in a restaurant, but until then, I will continue to find something I really like and put my twist on them to make them mine. These Whoopie Pies do not have the usual cream filling. What they do have is my signature cream cheese filling, adapted to be a little sweeter to counter balance the spicy pumpkin cake that the filling is sandwiched by. Enjoy!


INGREDIENTS:
Cake:
2 cups packed light brown sugar
1 cup vegetable oil
1 1.2 cups solid pack pumpkin puree
2 eggs
3 cups all-purpose flour
1 teaspoon salt
1 teaspoon baking powder
1 teaspoon baking soda
1 teaspoon vanilla
1 1/2 tablespoon pumpkin pie spice

Filling:
1/2 cup butter, room temperature
8 ounces cream cheese
1/2 tablespoon vanilla
2 1/2 cups confectioners sugar

Preheat oven to 350°F/180°C.
Lightly grease cookie sheets - I spray them with Pam and then use a piece of wax paper to spread it lightly on the pan. Set them aside.

In a large bowl, combine flour
salt, baking powder, baking soda and pumpkin pie spice
Whisk to combine
Set aside.
In a large mixing bowl, combine oil
and pumpkin
It will not look appealing

add the brown sugar (sorry, forgot the picture)
eggs and vanilla
and beat until combined well.
On low speed, mix in the flour mixture
until combined
Using a large spoon, put the batter into a gallon-sized Ziplock bag
Cut off the bottom corner - about 1/4"-1/2". Be careful, because as soon as you cut off the tip, the bag decides that it's time to make to cakes whether you are ready or not. Gravity is a wonderful invention! So, lightly squeeze the dough onto the cookie sheets. The cakes will spread slightly, so make sure you leave enough room in between them.
Put them into the preheated oven and cook for 10-12 minutes.
Using a spatula, remove them from the cookie sheet to a cooling rack. Repeat with all remaining dough, making sure you have an even number of cakes. It would be a horrible thing to have an uneven number, because then you would have to eat a cake without the filling while you were waiting for them to cool!
Now wipe the crumbs off of the corner of your mouth and make the filling while to cakes are cooling.

Beat cream cheese, butter and vanilla
until smooth
On low speed, and as I said in my Banana Walnut Cupcake blog, I cannot stress this enough, I mean low speed, slowly mix in the powdered sugar until creamy. (If you don't do this slowly, everything within reach will be lightly covered in powdered sugar.) You should stop mixing occasionally to scrape down the sides of the bowl, and once the sugar is mixed in well, turn up the speed to get it nice and fluffy.
Using a cake spatula or spoon, scoop some filling onto one cake
then top with another cake that's close to the same size ans the cake on the bottom.
I don't think any of my cakes were the same size. I got 22 complete Whoopie Pies out of this recipe, so the number is going to vary depending on the size you make them. I don't think any size is wrong, and I like to have various sizes. Someone might like a small one so they don't feel as bad when the have a second one. And someone will have a second one, guaranteed!
Thanks for reading my blog, and I hope that you try these. They are easy and you can get the kids to help with this one.
Let me know what you think!
Kathi


Friday, September 14, 2012

Banana Walnut Cupcakes with
Cream Cheese Frosting

It's funny how get an idea in my head for something that sounds really good to make. When I go shopping, I make sure to have all of the ingredients I need for that recipe. I come home with really good intentions, but then something happens, life usually, and I end up not making the recipe. Then you find the odd ingredient three months later in the pantry and have no idea why you bought it!
When you buy banana's for a recipe, make sure that your husband knows not to eat the bananas. That's what happened the first time I went to make this recipe. So the next time I bought bananas, I made sure to tell him not to eat them, that they were going into a recipe I was making. Well, the creative juices ended up not flowing, and the bananas ended up in the trash, of coarse, after the fruit flies arrived and they were black as night. Then, I got yelled at for wasting the bananas. But when you buy bananas, you can't use them that same day for a recipe. You have to wait for them to be over-ripe so they can be mashed very easily. This time I got smart, and bought over-ripe bananas so I could use them while I was in the mood. Third time's a charm, they say!

Makes 24 cupcakes

INGREDIENTS:
1 stick butter, softened
1 1/2C. granulated sugar
2 eggs
1 tsp. vanilla
1 to 1-1/2C. mashed ripe bananas *
1/2C. buttermilk
2C. flour
1 tsp baking powder
3/4 tsp baking soda
1/2 tsp salt
1/2C. chopped walnuts

CREAM CHEESE FROSTING:
1 stick butter, softened
1 8oz package cream cheese, room temperature
1/2 tsp vanilla
2C. sifted powdered sugar

DECORATION:
2T. minced walnuts


*Ok, here's where I cheated a little. The recipe was only supposed to have one cup of mashed banana. I mashed up 2 bananas and it was almost a cup, so what's it going to hurt? I added a third banana. I think this added so much more banana taste to the cupcake that I will so this from now on.

Preheat oven to 350°F.
In a medium bowl, combine flour, baking powder, baking soda and salt; set aside

In a large mixing bowl, cream butter and granulated sugar.

One at a time, add the eggs until combined
The add the vanilla, bananas and buttermilk

On low speed, add the flour mixture to the banana mixture
 until throughly combined
Fold in the 1/2C chopped walnuts
Line cupcake pans with the pretty paper of your choice and fill 2/3 full with cupcake batter
Bake for 15-20 minutes (mine took 20)
Place pans on top of racks to cool for 10 minutes

then remove cupcakes from pan and place on racks to cool (about one hour)

Now, make your frosting. 
Clean out the mixing bowl you just used and make sure it's dry.
Beat cream cheese, butter and vanilla 
until smooth
On low speed, and I cannot stress this enough, I mean low speed, slowly mix in the powdered sugar until creamy. You should stop mixing occasionally to scrape down the sides of the bowl, and once the sugar is mixed in well, turn up the speed to get it nice and fluffy.
You can either get fancy and put the frosting into a piping bag
or just use a knife. Now frost away! 
Sprinkle the minced walnuts

onto the frosting and voila!

These are by far, I think, the best cupcake I've ever made. I'm not trying to gloat, but I loved these, and so did a lot of my co-workers.

Thanks for reading. Feel free to leave me any comments, and have a great weekend!
Kathi

Thursday, September 6, 2012

Chicken Parmesan

I'm calling this a two-fer. You can serve it over pasta, or eat it as a sandwich. Personally, I much prefer the sandwich. Nice, crispy chicken with ooey-gooey melty cheese on a lightly toasted bun. Don't judge, but I'm just not a fan of pasta. I realize that's not normal, but I think I was damaged but my grandmother, who thought that pasta should be cooked until you couldn't cook it any more. It was horribly mushy and was always accompanied by a big glass of milk. I am also not a fan of milk. When I wouldn't drink my milk at dinner, it got put into the fridge for me to have in the morning... yuck! So on that note, pasta is not one of my go-to meals. That obviously helps with the carb intake, which is a good thing.

INGREDIENTS:
3 boneless, skinless chicken breasts
2 eggs
1C. Italian flavored bread crumbs
1C. grated Parmesan cheese
1/2C. vegetable oil - for frying
1 jar spaghetti sauce
6 slices mozzarella cheese


Rinse and pat the chicken to get rid of any excess water. Trim any fat from your chicken and cut them in half width-wise.
You will need a meat mallot
(a frying pan will work too)
and plastic wrap
Cut yourself a nice long piece of plastic wrap
and place a piece of chicken about 1/3 from the right-side edge
fold the wrap over the chicken

With the flat side of the meat mallot
beat the crap out of the chicken until it's about 1/2" thick. If you've never done this before, start out lightly until you get the hang of it. I usually start in the middle of the piece of chicken and work my way out. If you beat on it too hard, it will turn to chicken mush.
Continue until all of your chicken is pounded out.
Set aside
In a pie plate, add eggs
and beat with a fork until it looks like scrambled eggs
In another pie plate, combine bread crumbs and Parmesan cheese
Now, get a cookie sheet and a cooling rack. I wrap the cookie sheet with aluminum foil to save on clean up later. Place the cooking rack on top of the cookie sheet
Now set up an assembly line: chicken, eggs, crumbs, cooling rack with cookie sheet
Using tongs, take a piece of chicken and dip it in the eggs, turning so it's coated on both sides. Then place it in the crumbs and make sure it's well coated with crumbs on both sides. Then place on the cooling rack.
Continue until all of the chicken is coated
Then place in the refrigerator for 30 minutes.
This will help the coating stick to the chicken.
Preheat oven to 375°F.
Heat oil in a non-stick frying pan at about medium to medium high heat. I started mine at 7, then reduced it to 6.
Add 3 pieces of chicken to the hot oil
and cook for about 5 minutes.
Emeril Lagasse used to say those knobs on your stove are not decoration. If the chicken is spattering a lot, turn the knob down a notch. Yeah, I said it. I typed it, then realized it afterwards. Homage to Emeril!
When the chicken is well browned on the one side, turn it over
and cook for another 4-5 minutes. Drain on a paper towel lined plate

Continue until all of the chicken is cooked.
Put the spaghetti sauce in a 9x13" casserole dish
Then place the chicken on top of the sauce
then place a slice of mozzarella cheese over each piece of chicken
Put in into the preheated oven for about 12-15 minutes, until cheese is melted and sauce is bubbling
Here is where you'd serve it over your pasta of choice.
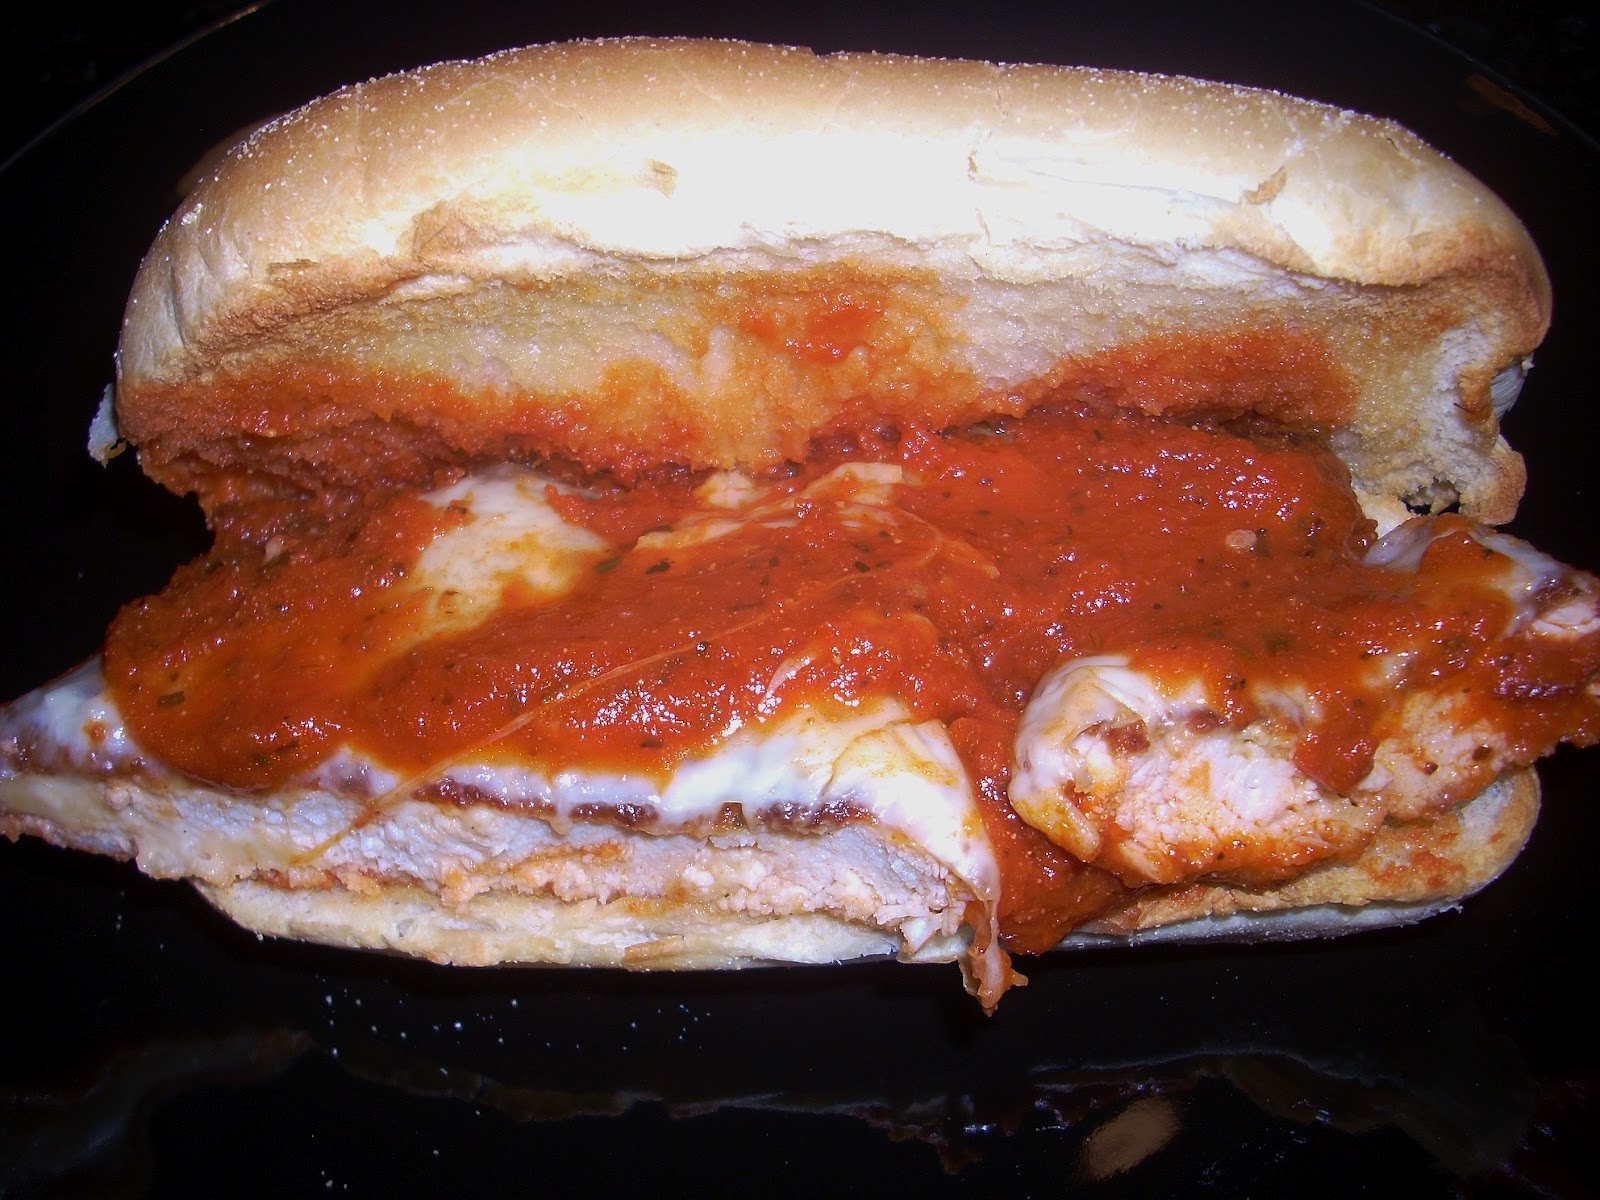
Here is where I toasted a sub roll, cut a piece of chicken in half, put a little sauce on it and ate it up...YUM!

So, tell me which you prefer, over pasta or as a sandwich. Either way, I hope you enjoy!